

Switch theme
Issuing Receipts
This page describes everything you do from the moment the items are on the receipt until the receipt is issued: editing items, the buyer, discounts, payment methods, advances and proforma invoices. All of it applies to both sales screens — retail sales and hospitality sales. How items are added to the receipt is described on each screen's page.
Before you issue a receipt:
- the shift must be open (see Working Day);
- the device must be registered as a cash register (see Devices).
The payment buttons are at the bottom of the receipt on both screens: DETAILS, CARD and CASH. Above them are the Buyer, Sum, Discount and To pay rows.
Editing an item on the receipt
Click an item on the receipt. A menu with the options for that item opens:
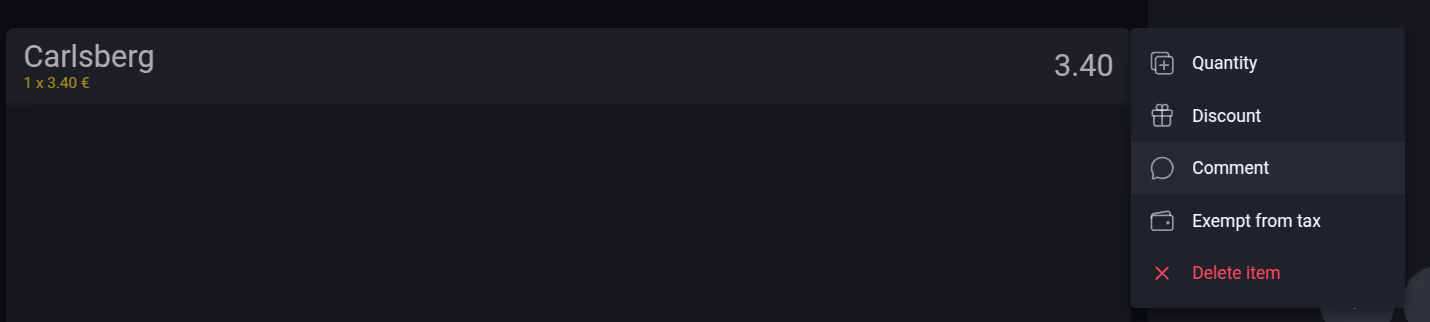
Item menu — the same options are available on both sales screens
| Option | What it does |
|---|---|
| Quantity | Changes the number of units or the quantity of the item. |
| Discount | Gives a percentage discount on this item only. |
| Price | Changes the item's price on this receipt only. |
| Comment | Adds a comment to the item (for example "no ice"). |
| Exempt from tax | Turns tax exemption for the item on or off. |
| Delete item | Removes the item from the receipt. |
The options apply immediately. The receipt is not issued until you choose a payment method.
Quantity
- Click the item and choose Quantity.
- Enter the new quantity and click OK.
The item amount is recalculated immediately. For items sold by measure, enter a decimal quantity (for example 0.75).
Note
The quantity cannot be 0 — remove the item with Delete item. With the +/- button in the window you can enter a negative quantity (for example to record returned goods). On such a receipt every item must have a negative quantity, and the receipt must refer to the earlier receipt (see Reference to an earlier receipt).
Item discount
- Click the item and choose Discount.
- Enter the discount as a percentage and click OK.
Before you confirm, the Item discount window shows the price, the discount amount and the amount to pay:
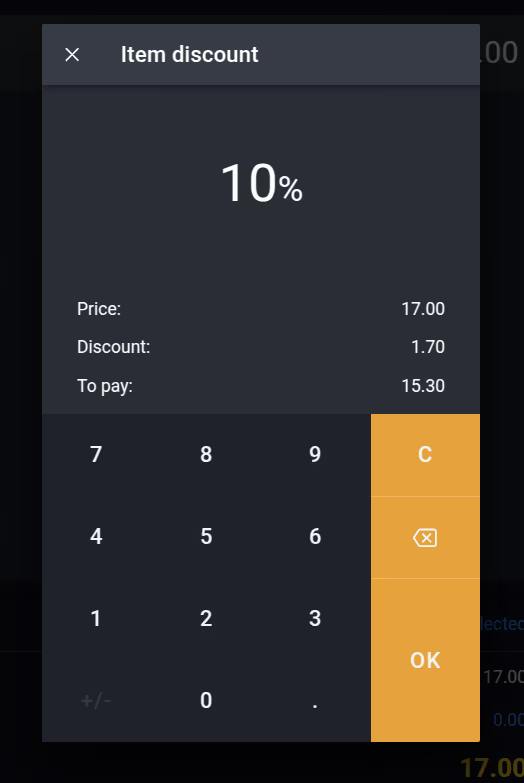
A 10 % discount on an item: before you confirm, you see both the discount and the new amount
After you confirm, the discount percentage is shown below the item on the receipt (in retail, also the discount amount). A discount on the whole receipt is described in Discount on the whole receipt.
Price
- Click the item and choose Price.
- Enter the new price and click OK.
The new price applies only to this item on this receipt — the item's price in your product list does not change. To change a price permanently, use Options or Administration.
Availability
If the venue uses inventory accounting, the Price option is not shown for goods (you then change the price with a price leveling).
Comment
Choose Comment and type the text (in retail) or choose one of the predefined comments (in hospitality; you add a new one with the ADD button). An item with a comment shows a speech-bubble icon.
The comment is printed on the order slip for the bar or kitchen. It is printed on the receipt only if Show item comments on receipts is turned on in Administration (see My Account → Settings).
Exempt from tax
Choose Exempt from tax to exempt the item from tax. On the retail sales screen, the item gets a red Exempt from tax label; on both screens, its price becomes the price without tax (tax rate 0). Choosing the same option again removes the exemption.
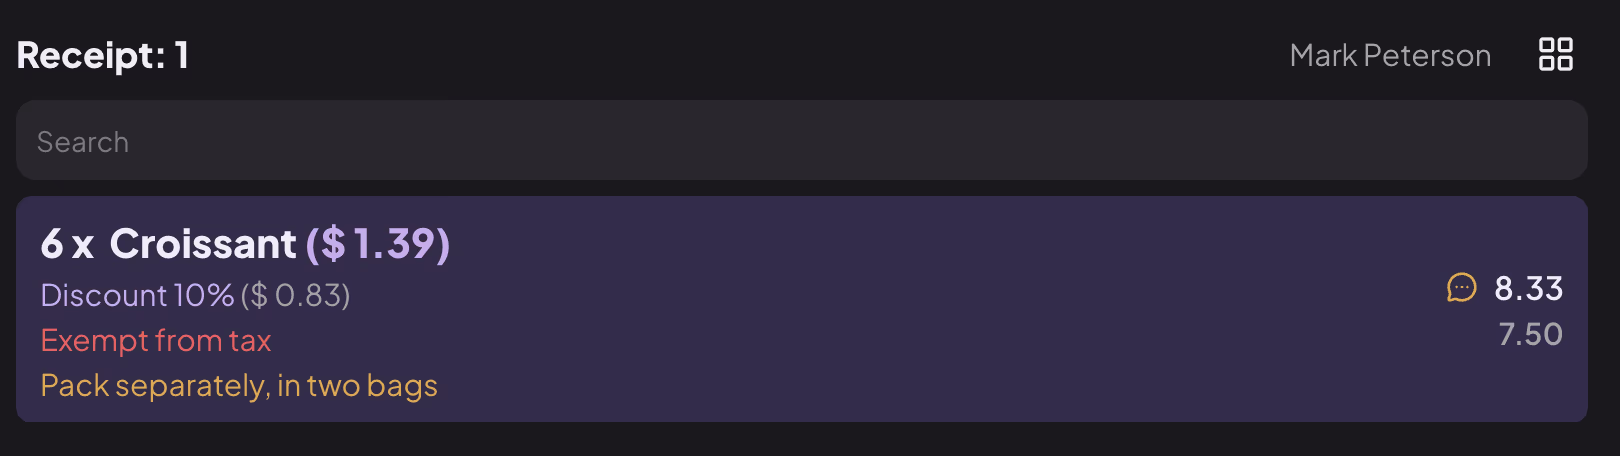
An item with a discount, a comment and a tax exemption — the price is reduced by the tax amount
Delete item
Choose Delete item. The item is removed from the receipt before it is issued.
Differences in hospitality
On a table's bill, items from rounds that have already been sent have fewer options:
| Option | New round (not sent yet) | Sent round |
|---|---|---|
| Quantity, Price | yes | no |
| Discount | with the Allow order item discount permission | with the same permission |
| Comment | yes | view only |
| Delete item | yes | with the Allow order item canceling permission; a cancellation slip is printed |
Permissions are set per user group (see Users).
Buyer on the receipt
Add a buyer when the receipt should carry their details. A buyer is required for an advance, and is usually added to receipts paid by invoice; on other receipts it is optional.
- Click the Buyer row.
- In the Select customer window, find the buyer by searching (name, identification number, card number), click them and then CONFIRM.
- If the buyer does not exist, click ADD and enter them (see Options → Clients).
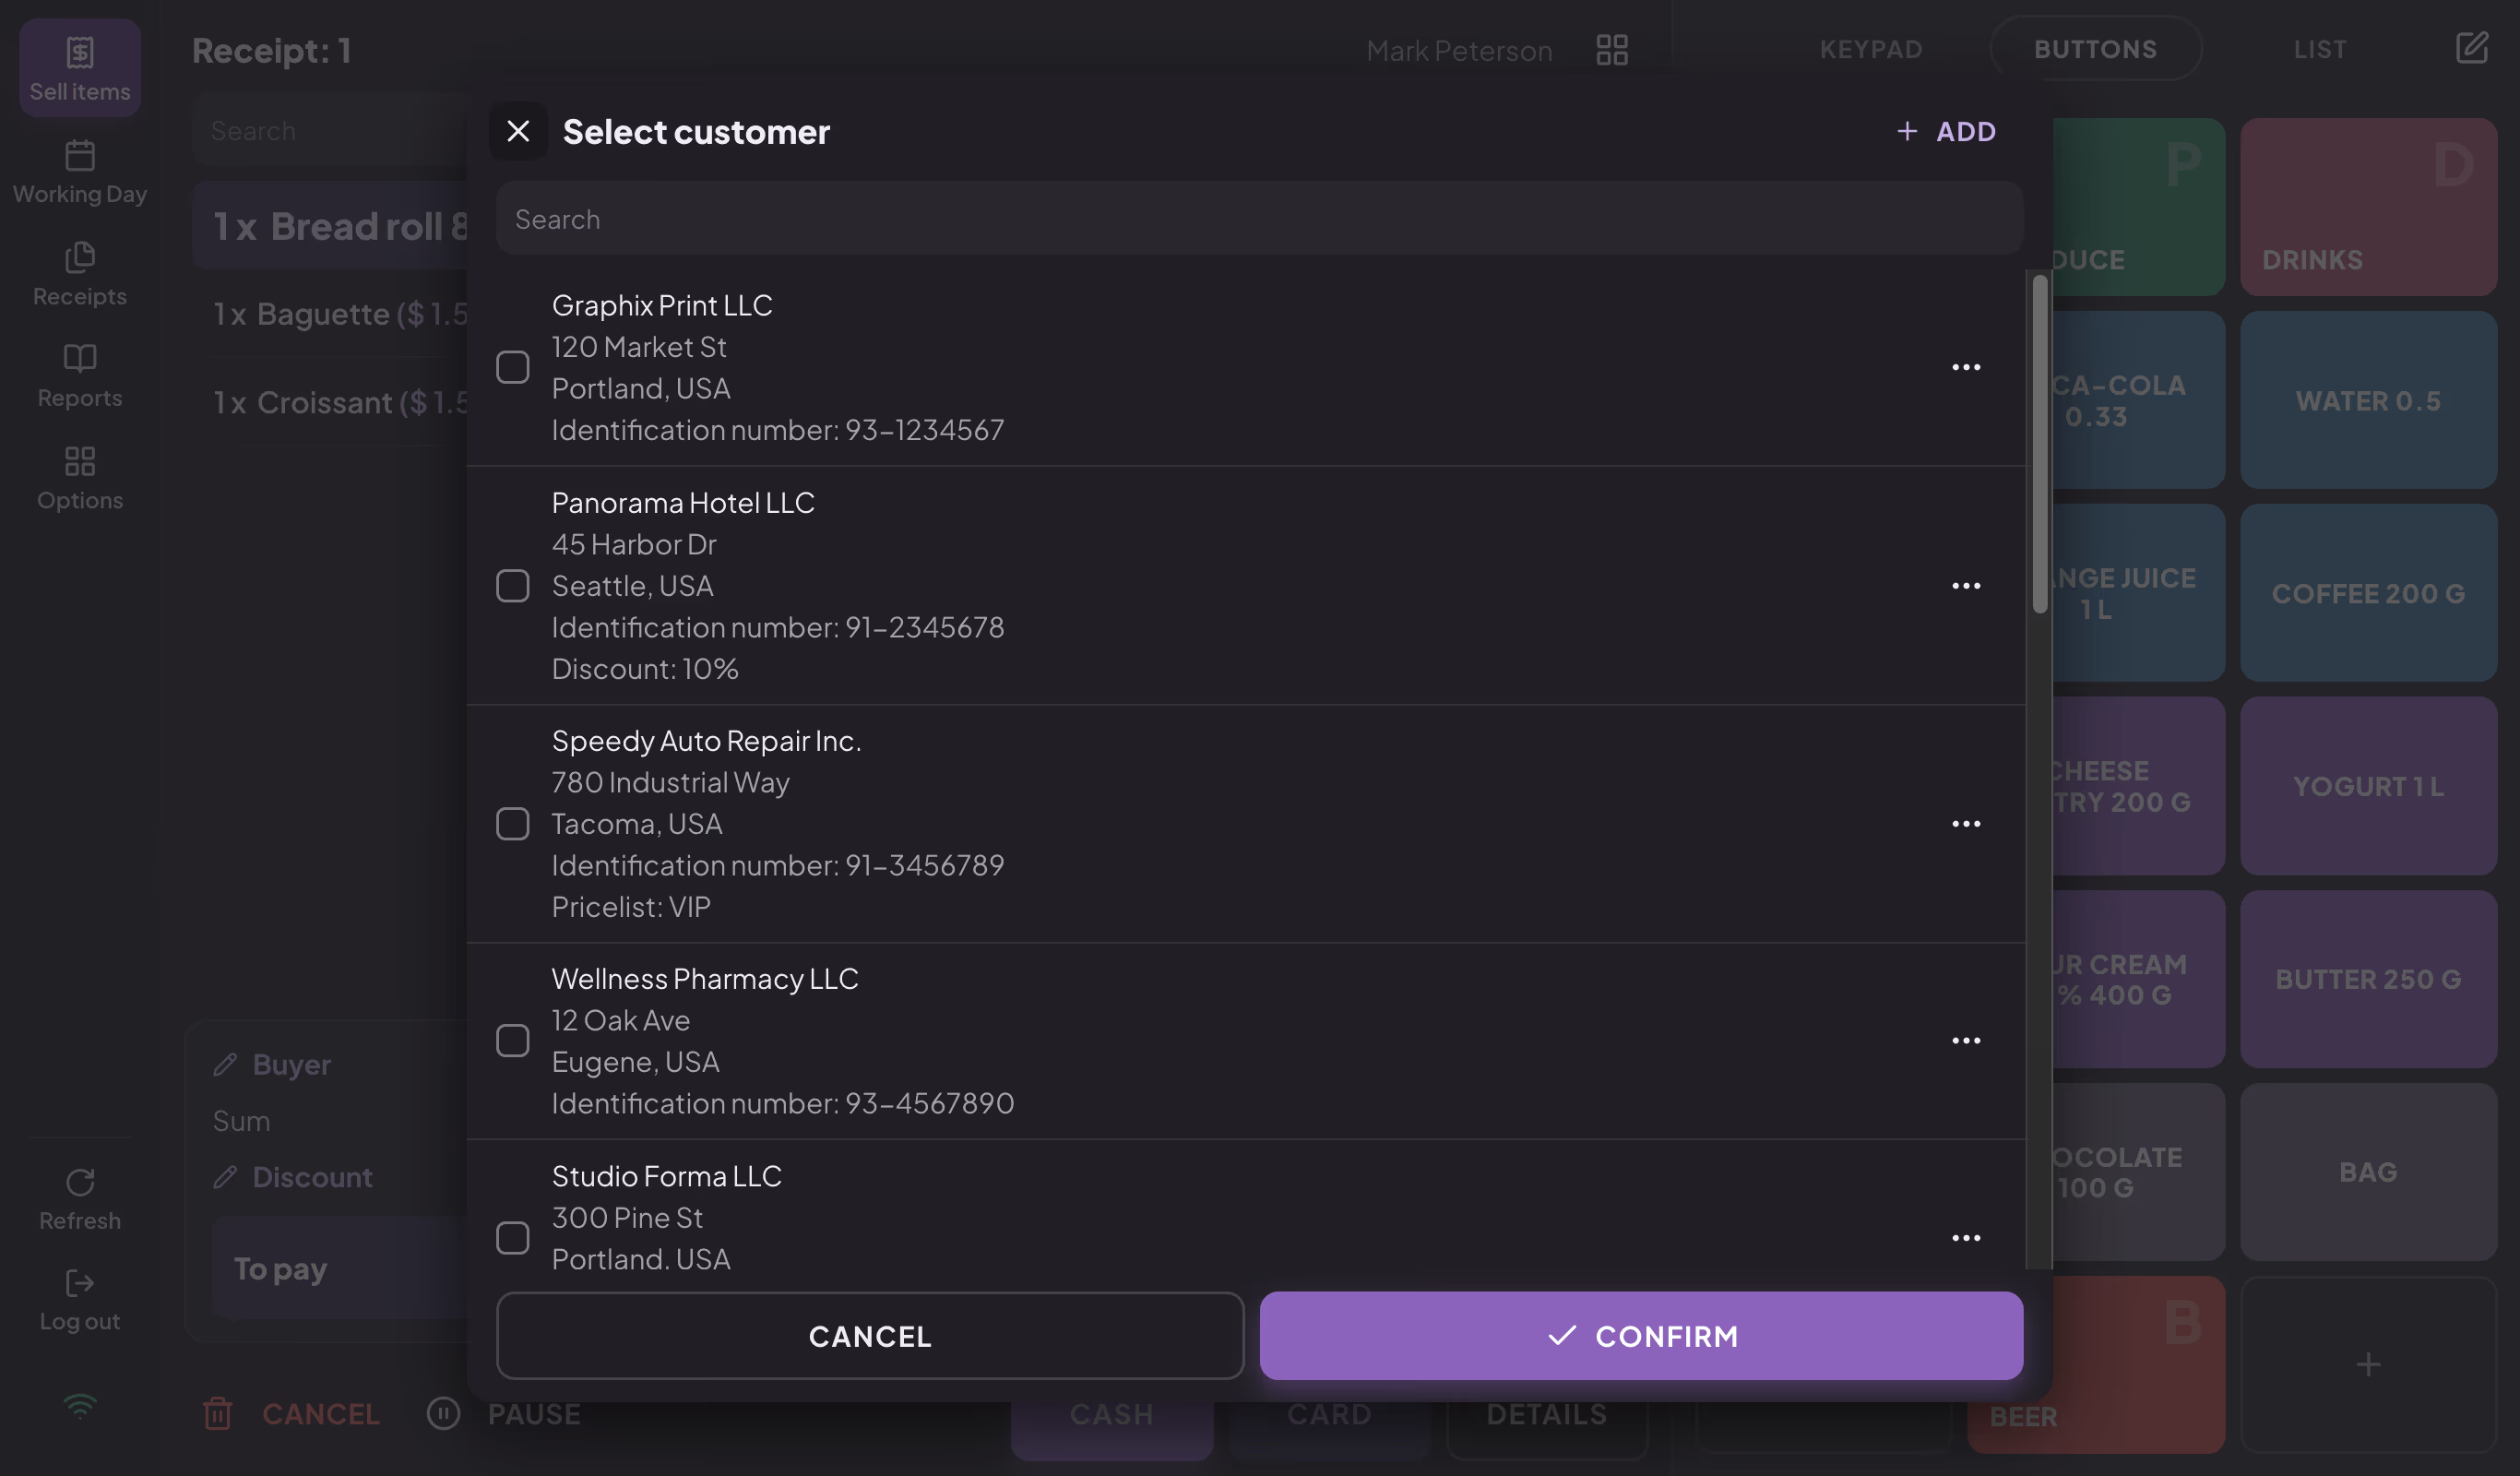
Choosing a buyer; with Add you enter a new buyer without leaving the receipt
If the buyer has a discount or a pricelist assigned, it is applied to the receipt automatically. A buyer who has both a discount and a buyer card can be chosen only by typing the card number (the list shows "Select only by card number").
Discount on the whole receipt
- Click the Discount row above the payment buttons.
- Enter the discount as a percentage (0–99) and click OK.
The same discount percentage is applied to all items on the receipt. If items already have different individual discounts (or only some items have a discount), the app shows "Discount not possible. There are already unique discounts given on individual items." — remove the individual discounts or set them per item.
Availability
In hospitality, a discount on the whole receipt requires the Allow order discount permission — without it, clicking the Discount row does nothing. The discount applies to all rounds of the selected guest.
Paying in cash
Click CASH. The receipt is issued and printed, and the screen is ready for the next customer.
If Enable cash payment change is turned on in Administration (see My Account → Settings), the Cash window opens before the receipt is issued: enter the amount the customer gave you, and the app shows the Change. Click OK to issue the receipt.
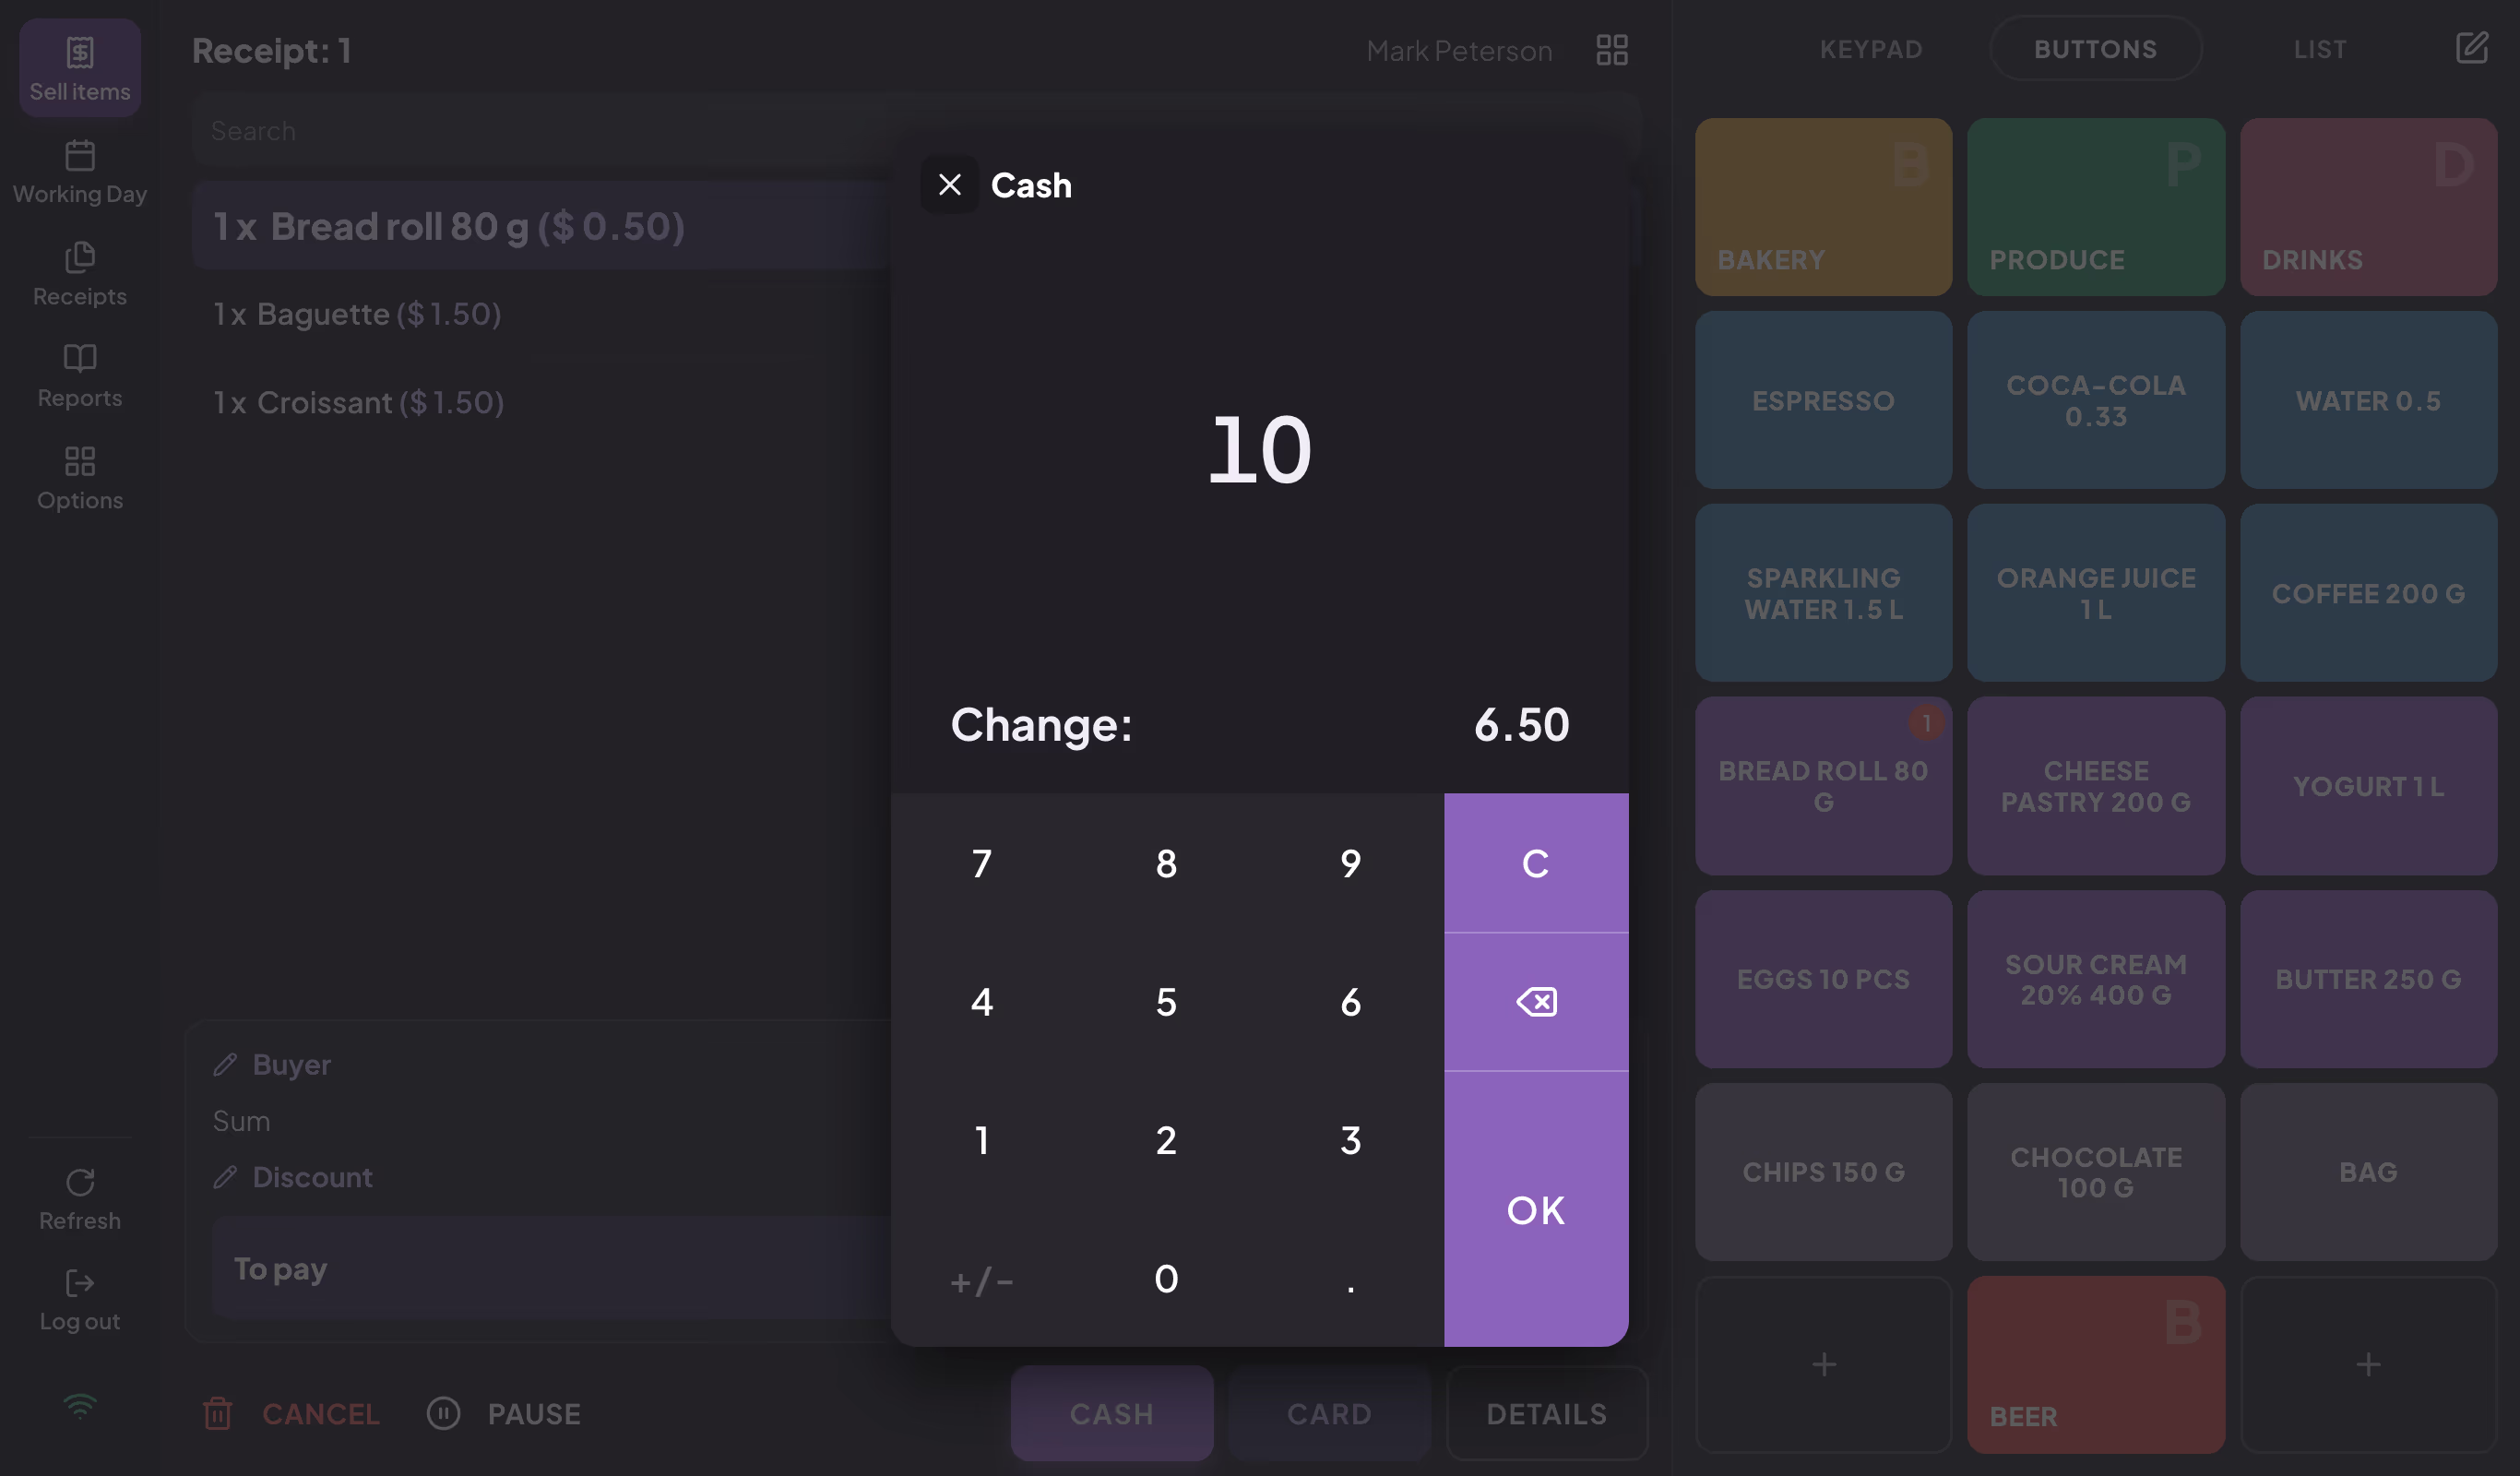
The Cash window when change calculation is turned on
Paying by card
Click CARD. The Credit card / Cash window opens with the whole amount set for the card:
- if the customer pays everything by card, click OK;
- if the customer pays part in cash and the rest by card, enter the cash amount in the Cash field — the card amount is reduced automatically — and click OK;
- if you enter a card amount higher than the receipt amount, the difference is shown as Tip.
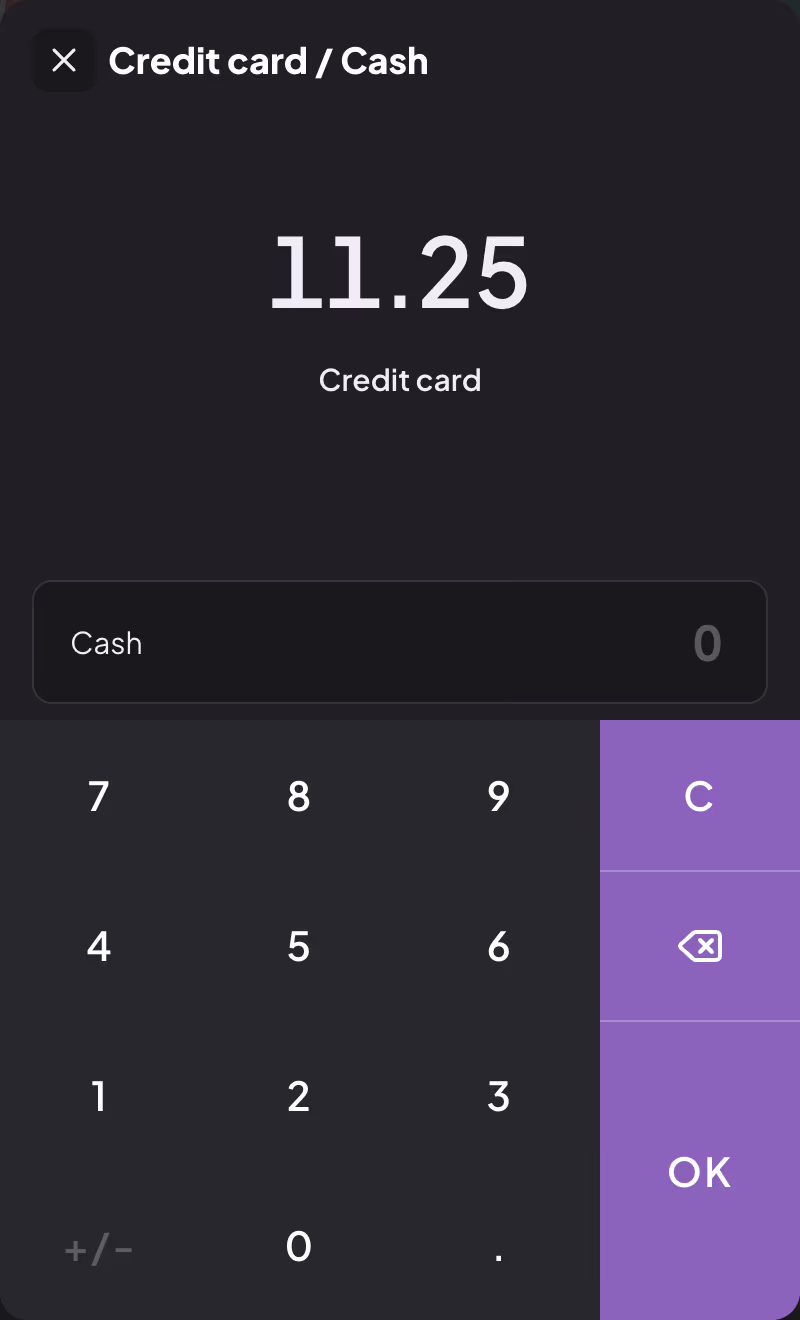
One receipt paid partly by card and partly in cash
Availability
If a card payment terminal is connected to an Android cash register, the app asks "Do you want to use the card on this device?". Choose YES to run the payment through the terminal, or NO if you charged the card on another terminal.
The terminal is used only with the CARD button. If you choose a card payment in the Receipt window or in a mixed payment, charge the amount on the terminal separately.
To pay with more than two payment methods, use Mixed payment.
Receipt details
The DETAILS button opens the Receipt window, where you choose the receipt type, the payment method and additional details. This is also where you issue an advance and a proforma invoice.
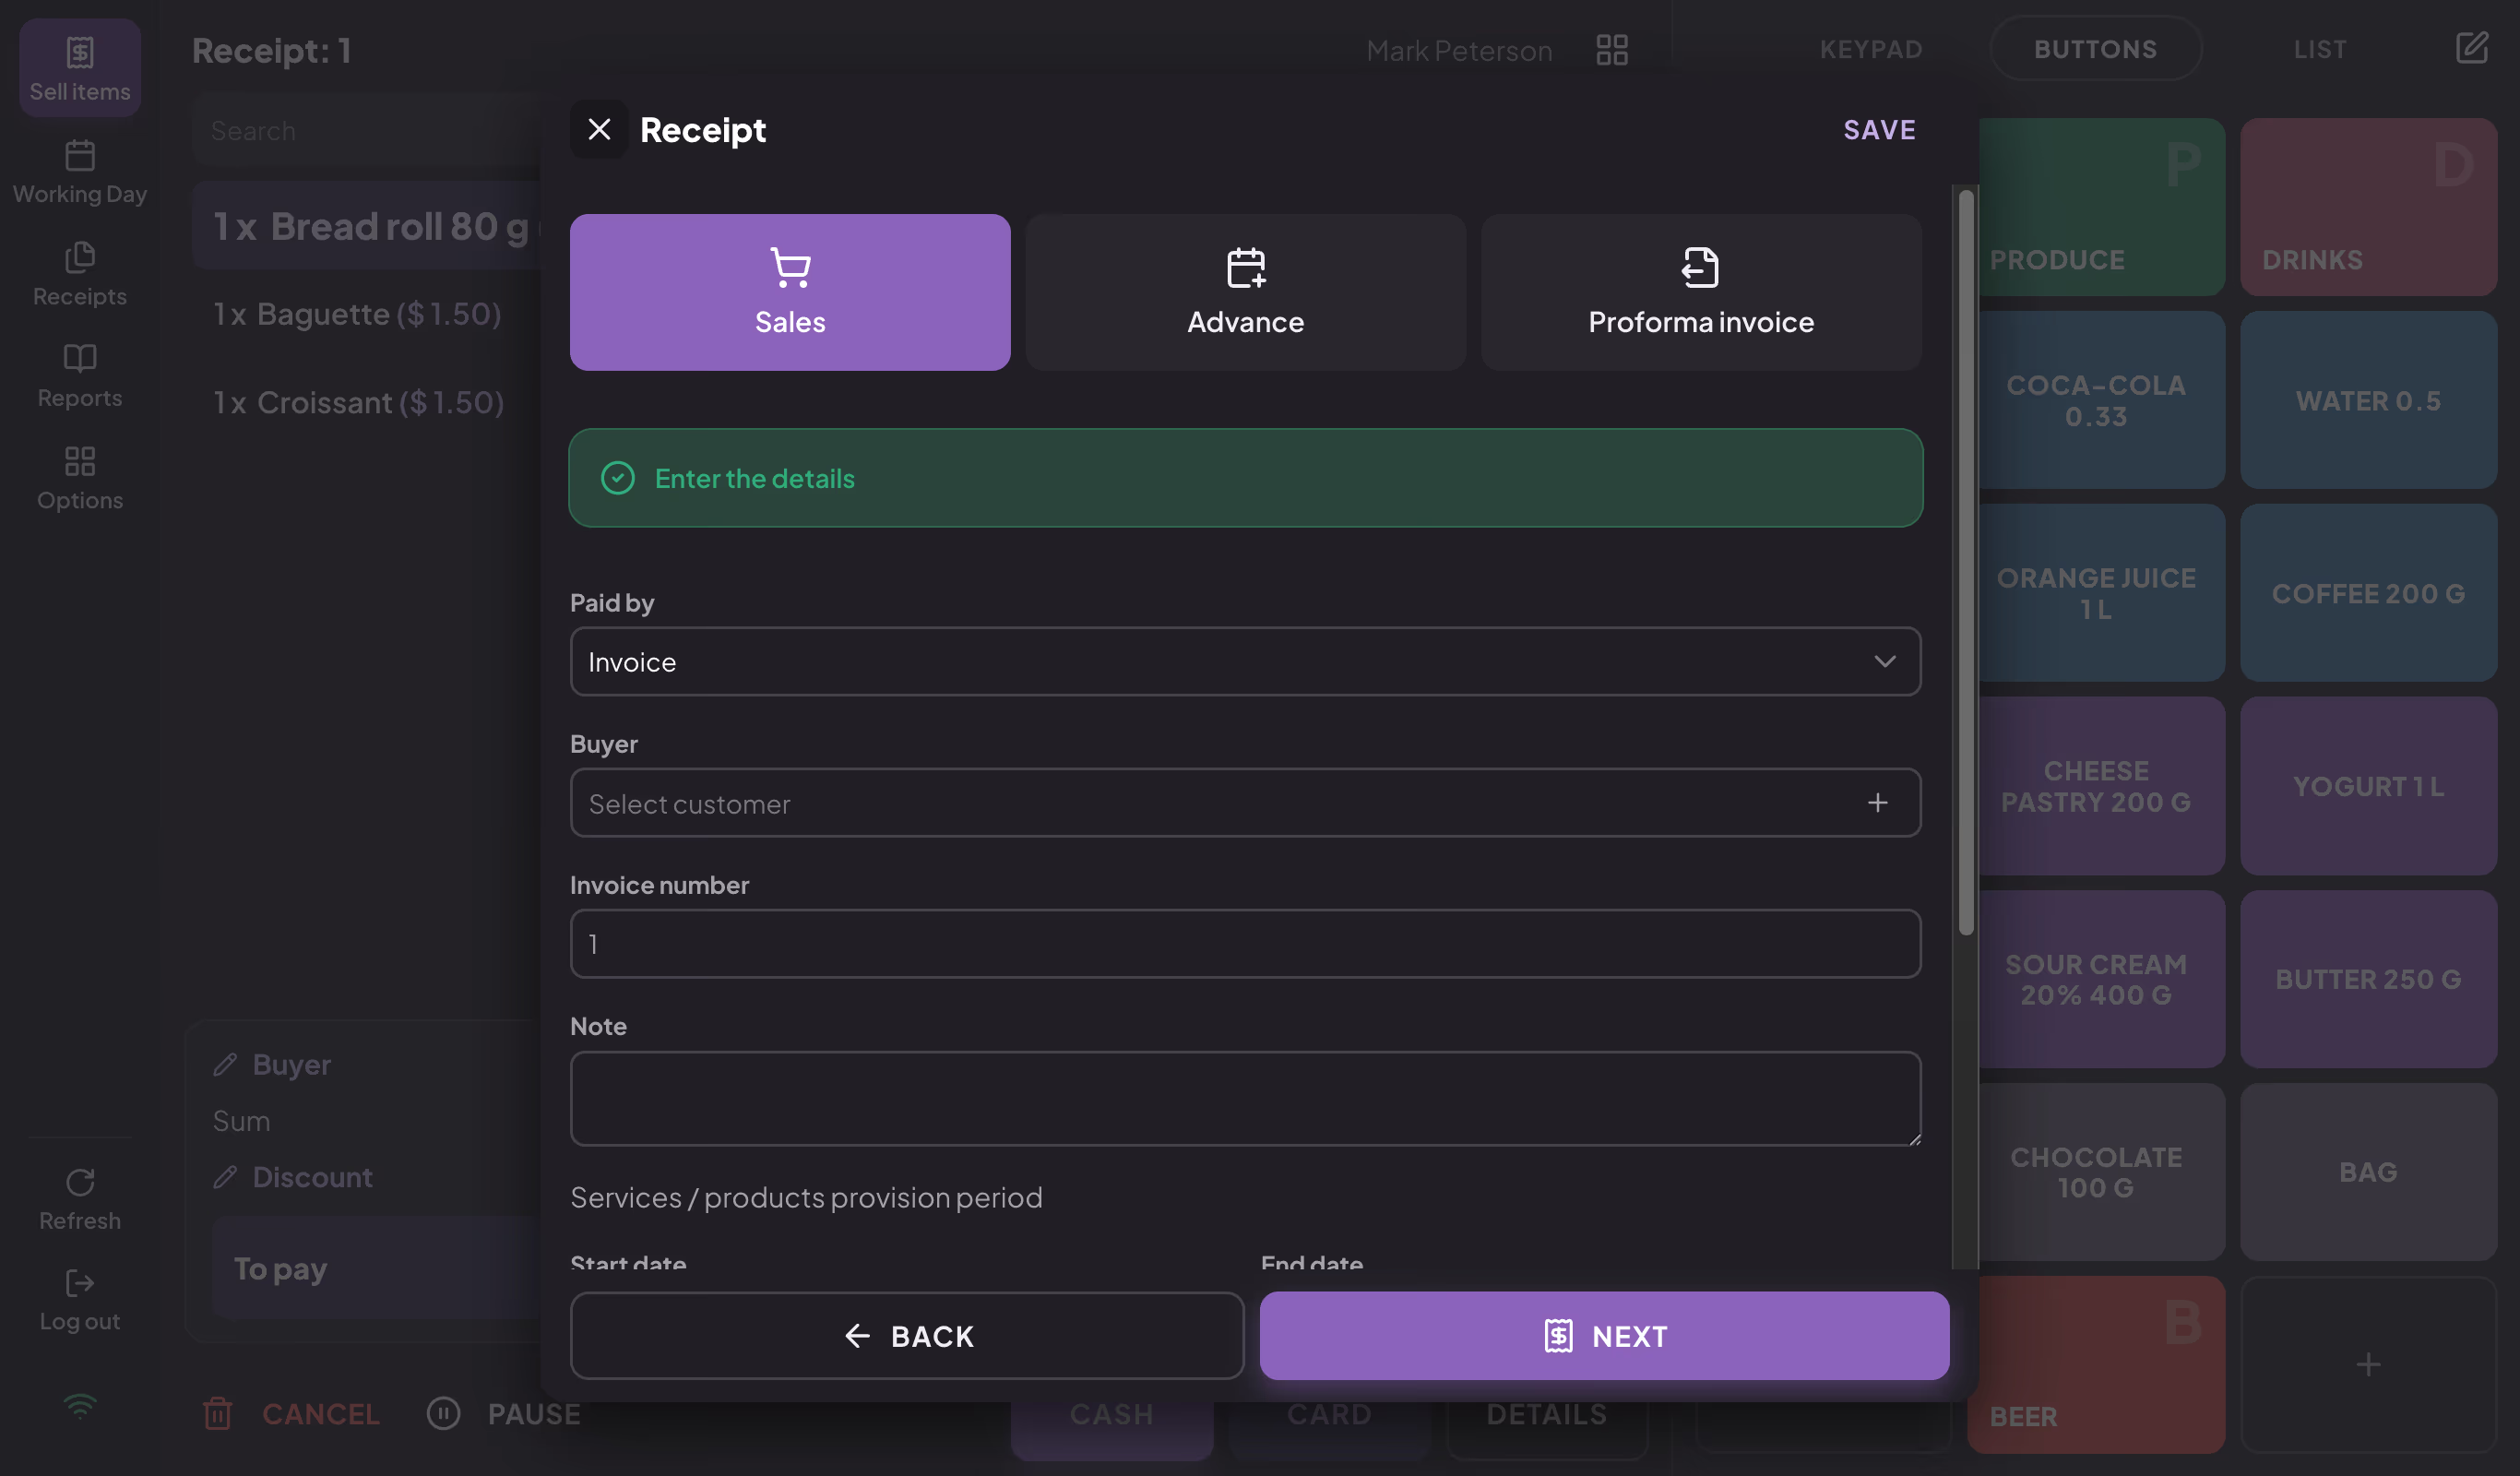
Receipt window, Sales tab
At the top of the window you choose the receipt type:
| Type | When to use it |
|---|---|
| Sales | An ordinary sales receipt — the most common case. |
| Advance | The customer pays in advance, and the goods or service are delivered later. |
| Proforma invoice | You give the customer an offer before payment. |
Then fill in the fields and click NEXT — the receipt preview opens (see Preview and issuing). The SAVE button in the window header saves the entered details on the open receipt without issuing it: you can charge later with CASH or CARD too, and the details are kept.
Warning
The window opens with the Invoice payment method selected. If you opened DETAILS only to add a note or a buyer, check the payment method before you click NEXT — otherwise you issue a receipt paid by invoice.
Payment method
The Paid by field offers the payment methods the cash register accepts:
- Cash
- Credit card
- Invoice (bank transfer)
- Check
- Voucher
- Instant payment
- Other noncash
- Mixed payment — several payment methods on one receipt
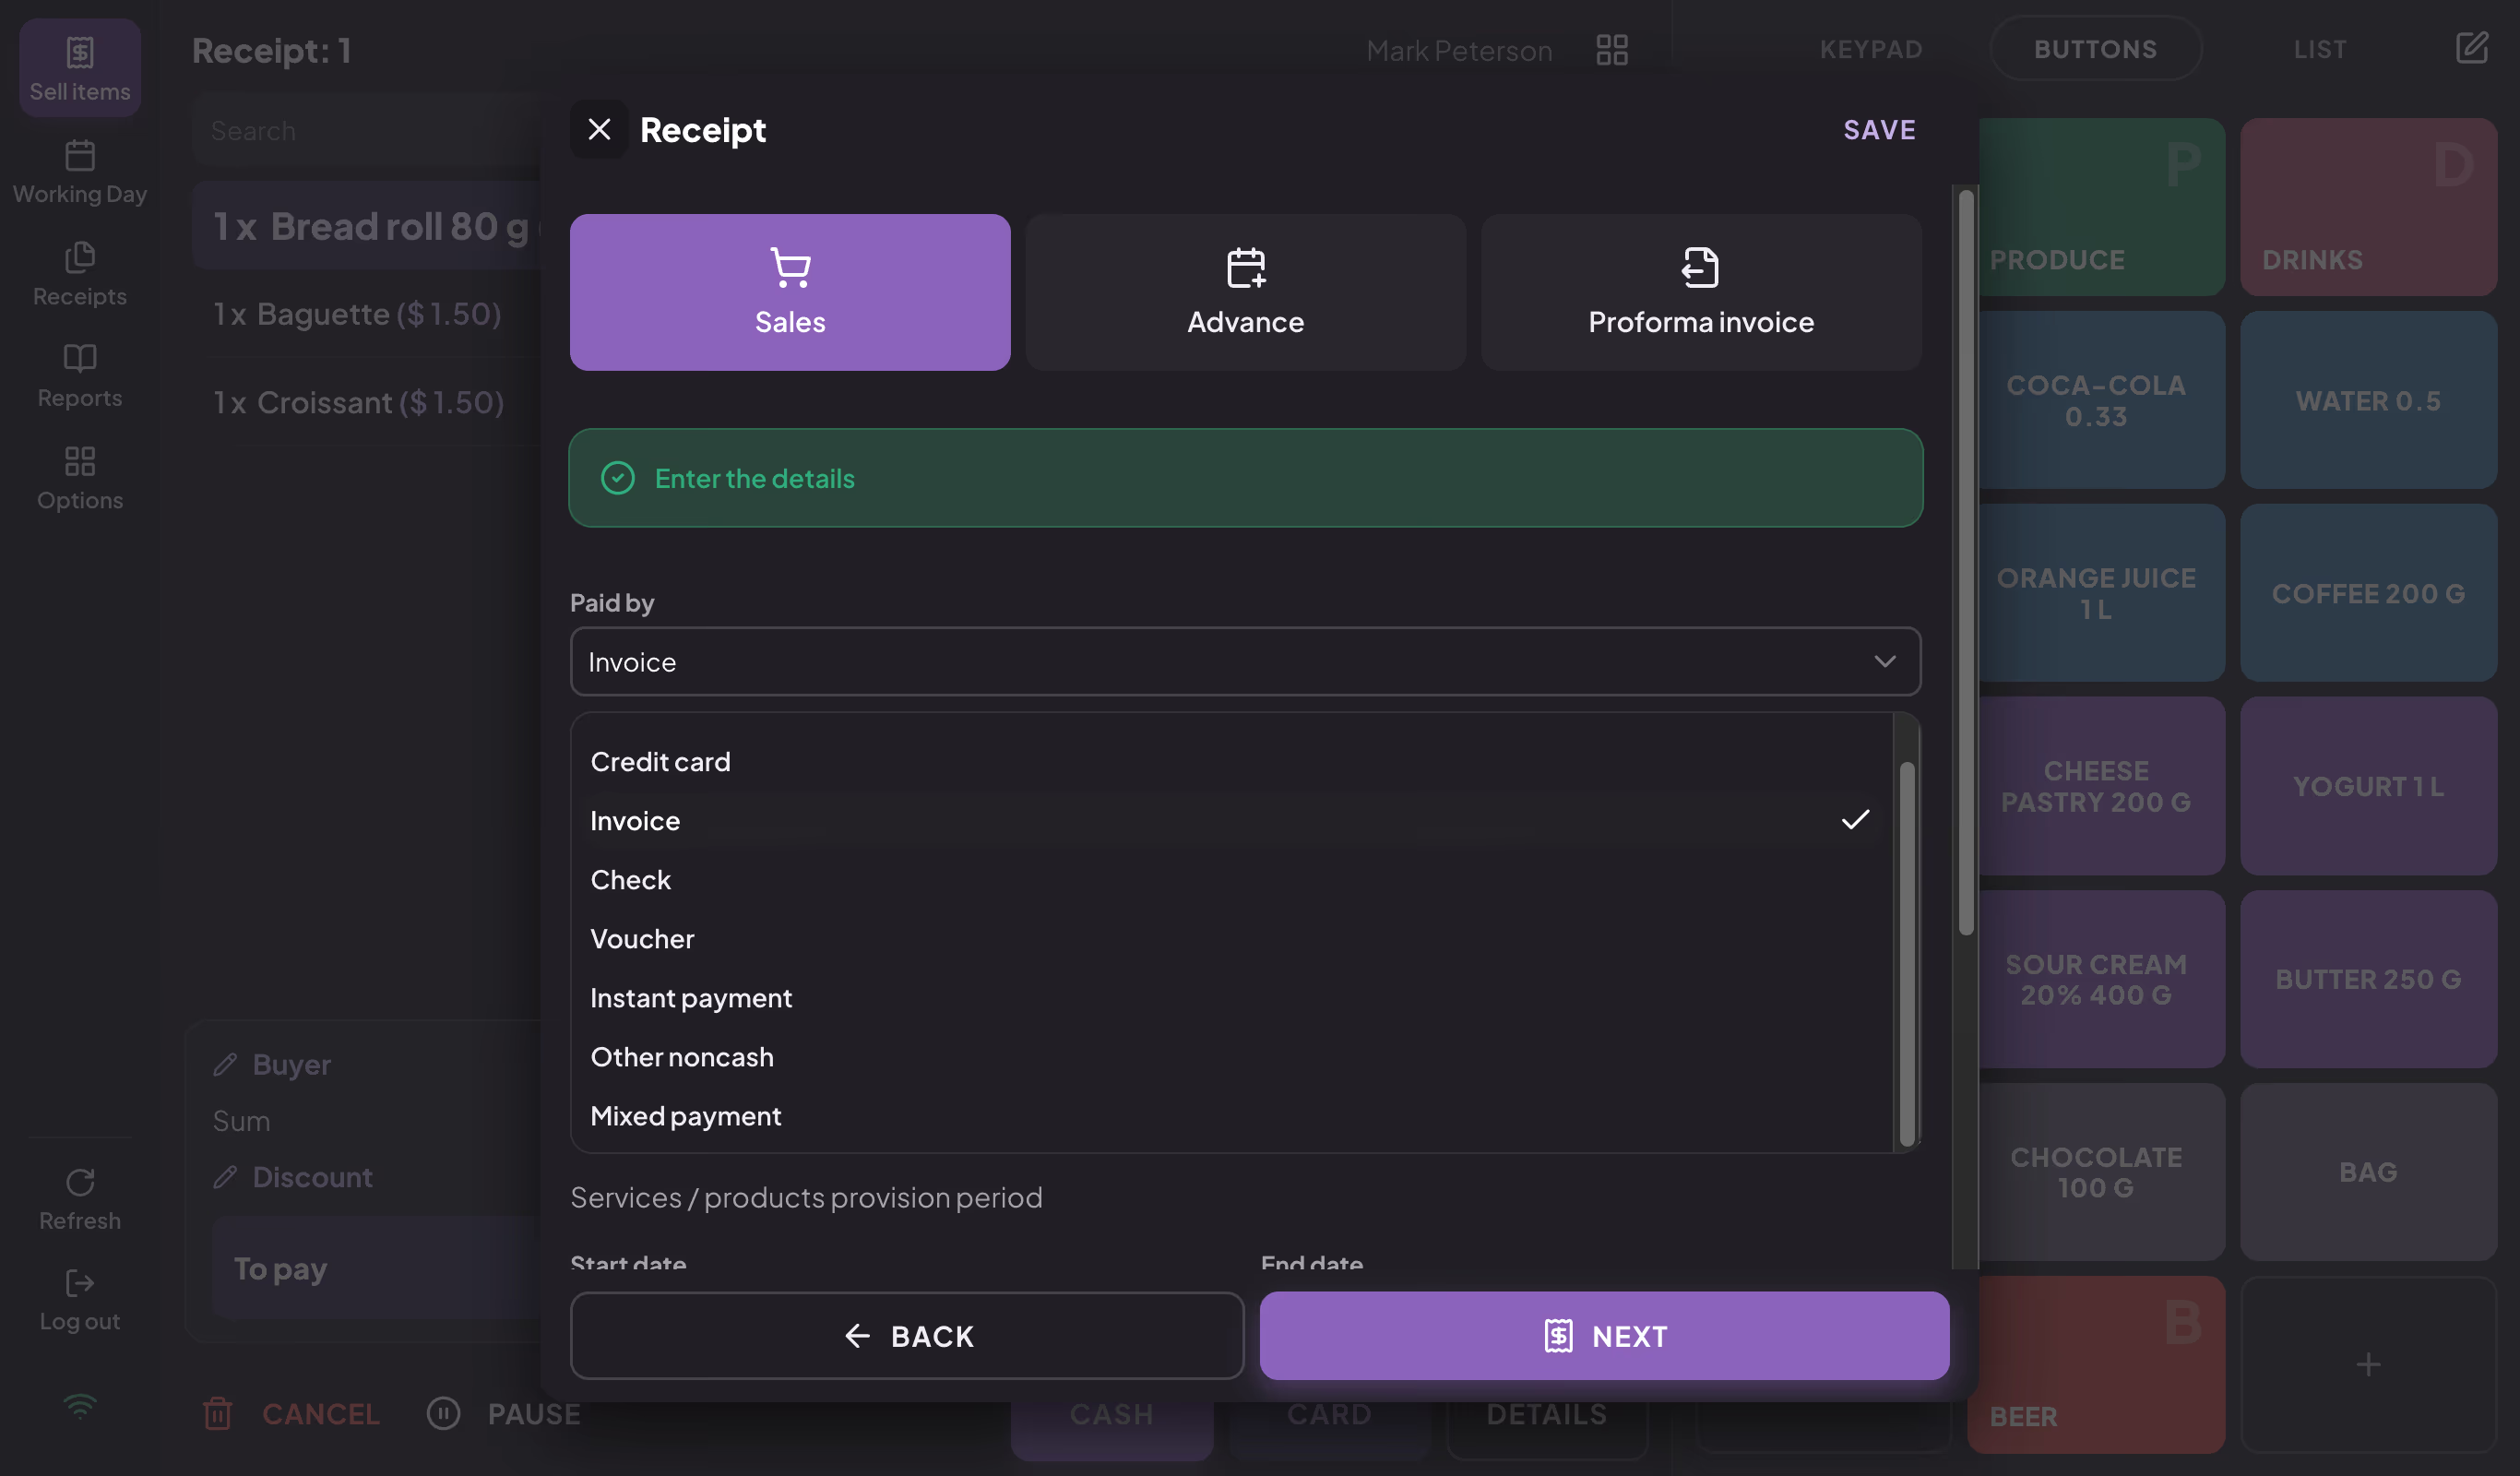
The payment methods the register offers
Mixed payment
With mixed payment you pay one receipt in several ways — for example partly in cash, partly by card and partly with a voucher.
- In the Receipt window, choose the Mixed payment payment method. The Mixed payment window opens immediately.
- Enter the amount for each payment method the customer uses. When you click an empty field, it is filled with the amount that remains to be paid.
- Watch the Remaining row — when it reaches 0, the amounts add up to the To pay amount.
- Click OK, then NEXT and ISSUE RECEIPT.
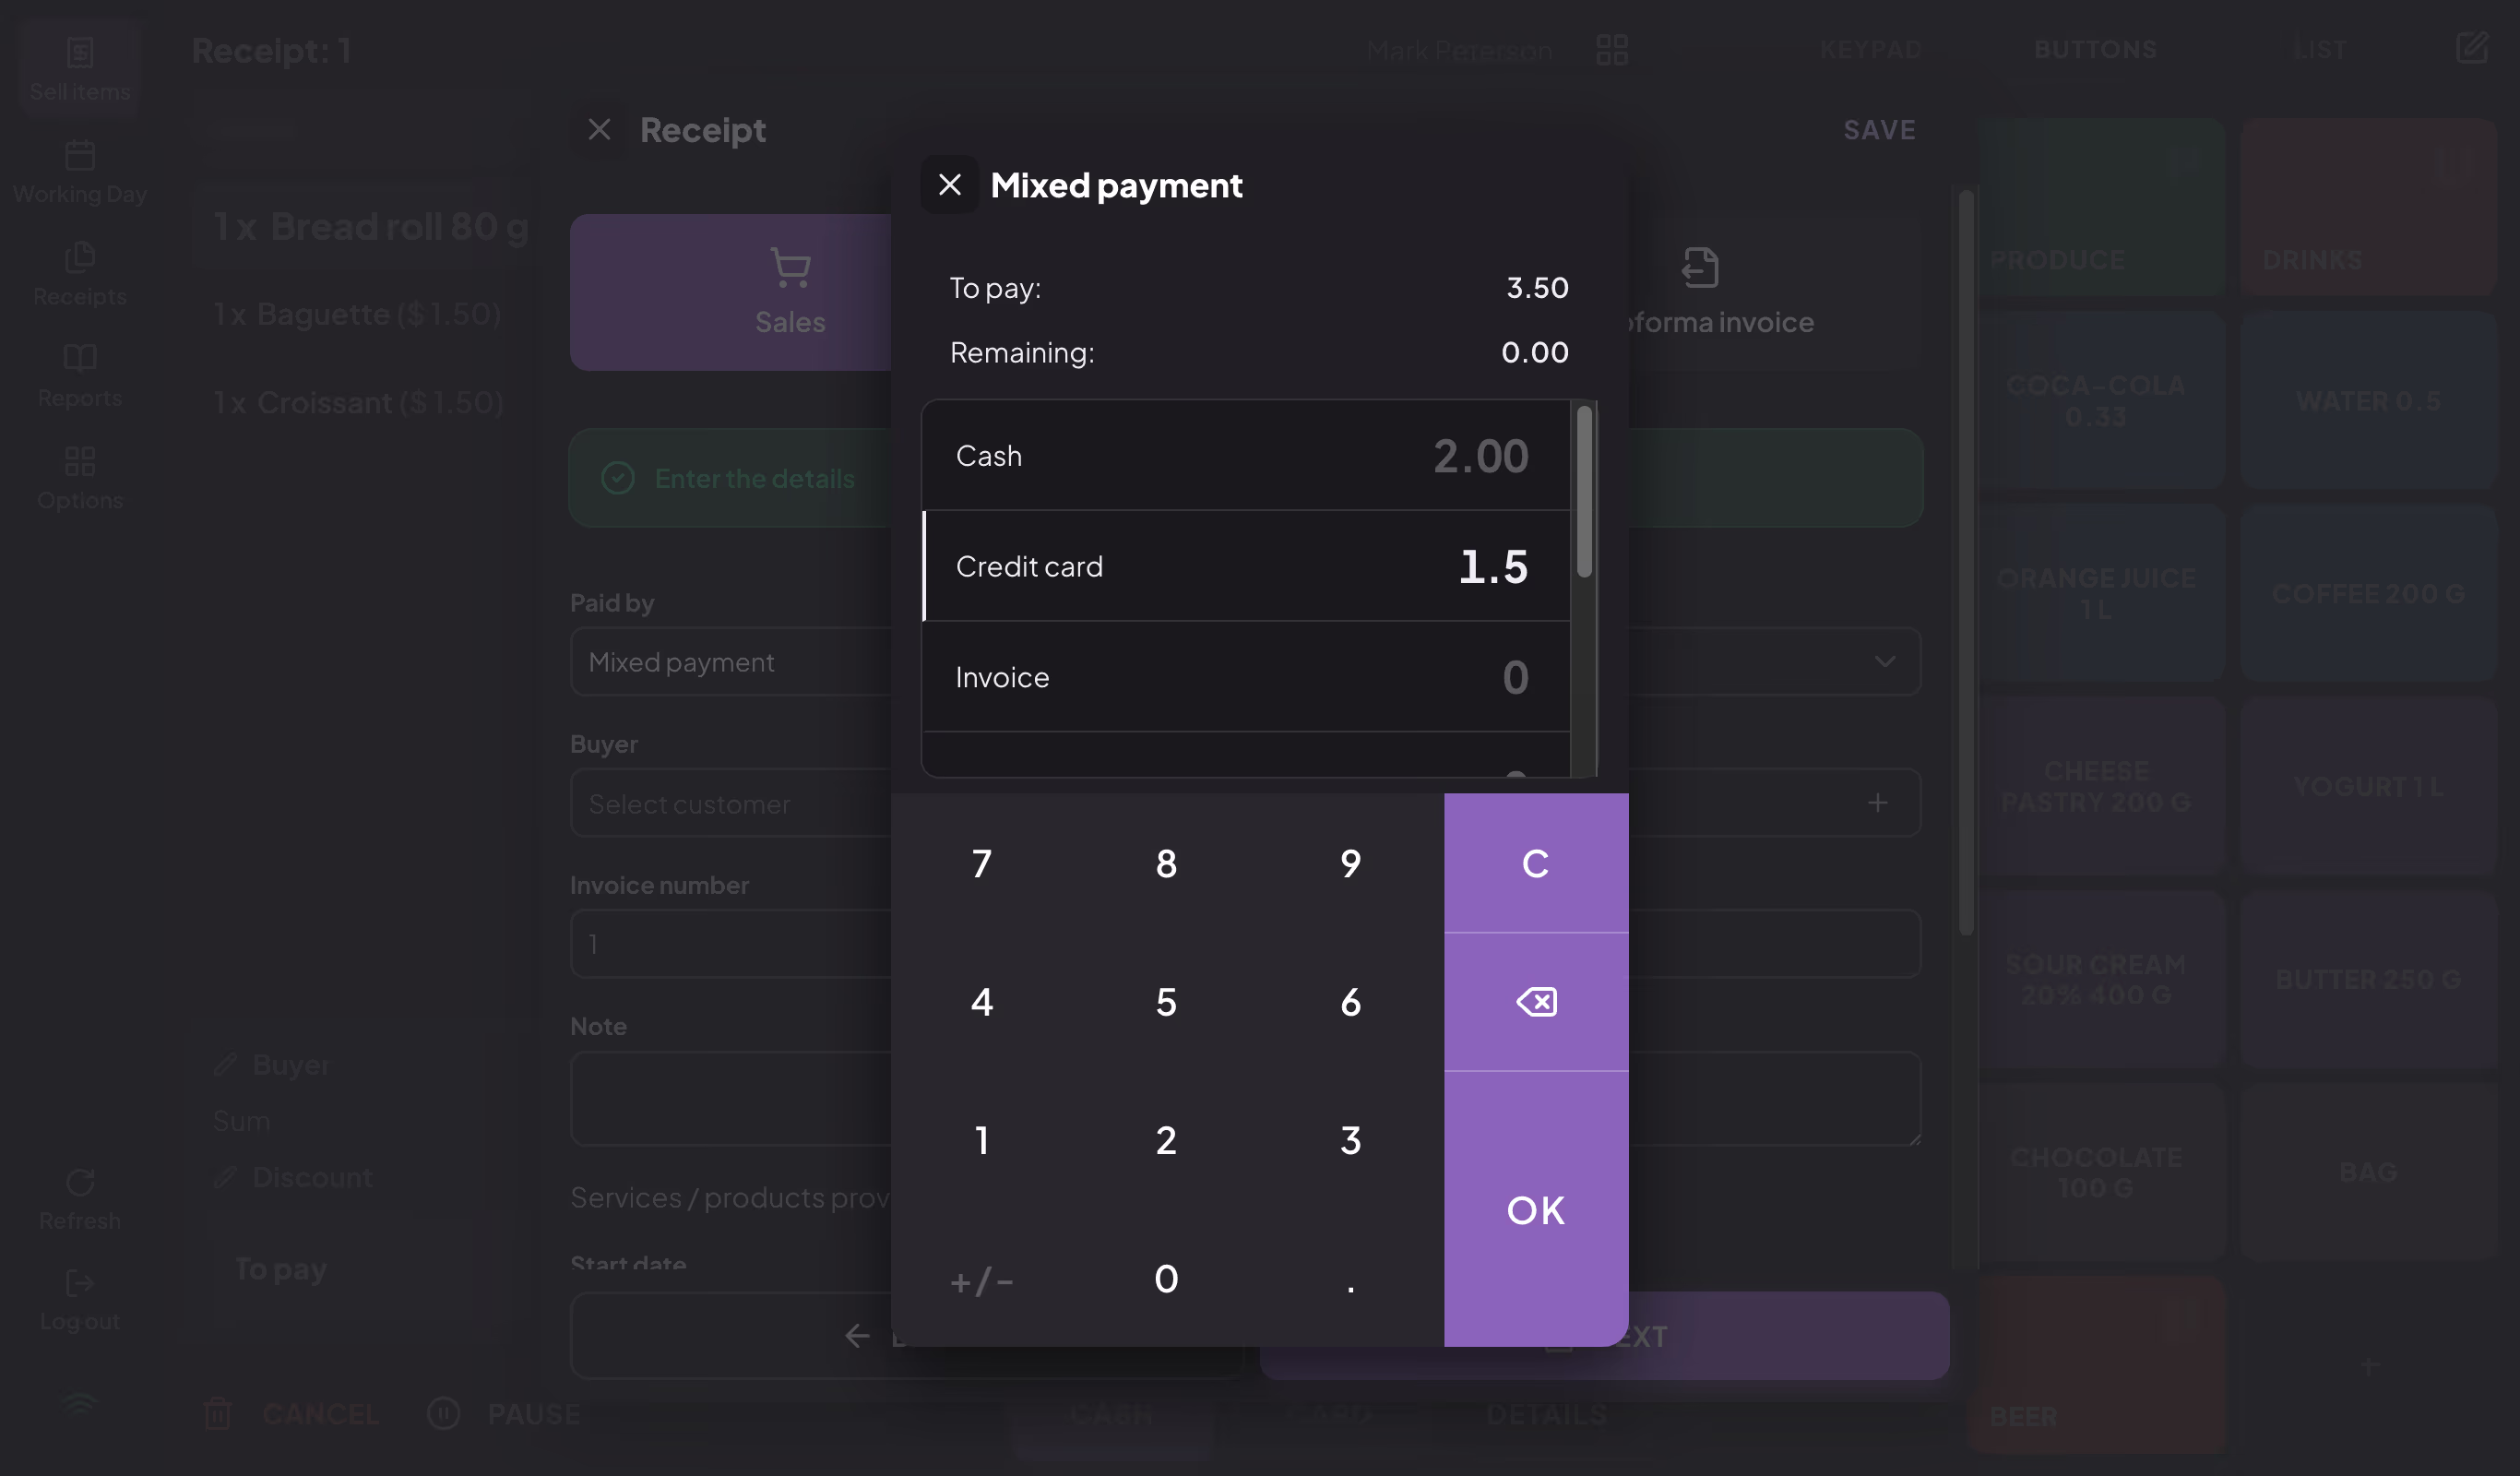
Mixed payment: the amounts per payment method must add up to the receipt total
The receipt lists each payment method with its amount.
Paying by invoice
- In the Receipt window, leave the Invoice payment method.
- Choose the buyer.
- If needed, enter the Due date, the Invoice number and a note.
- Click NEXT, check the preview and click ISSUE RECEIPT.
Except on Android devices, the preview of such a receipt opens in A4 format.
Advance
You issue an advance receipt when the customer pays in advance and delivery follows later.
- In the Receipt window, choose Advance.
- Choose the buyer — it is required for an advance.
- Choose the payment method and, if needed, the Advance payment date.
- Click NEXT and ISSUE RECEIPT.
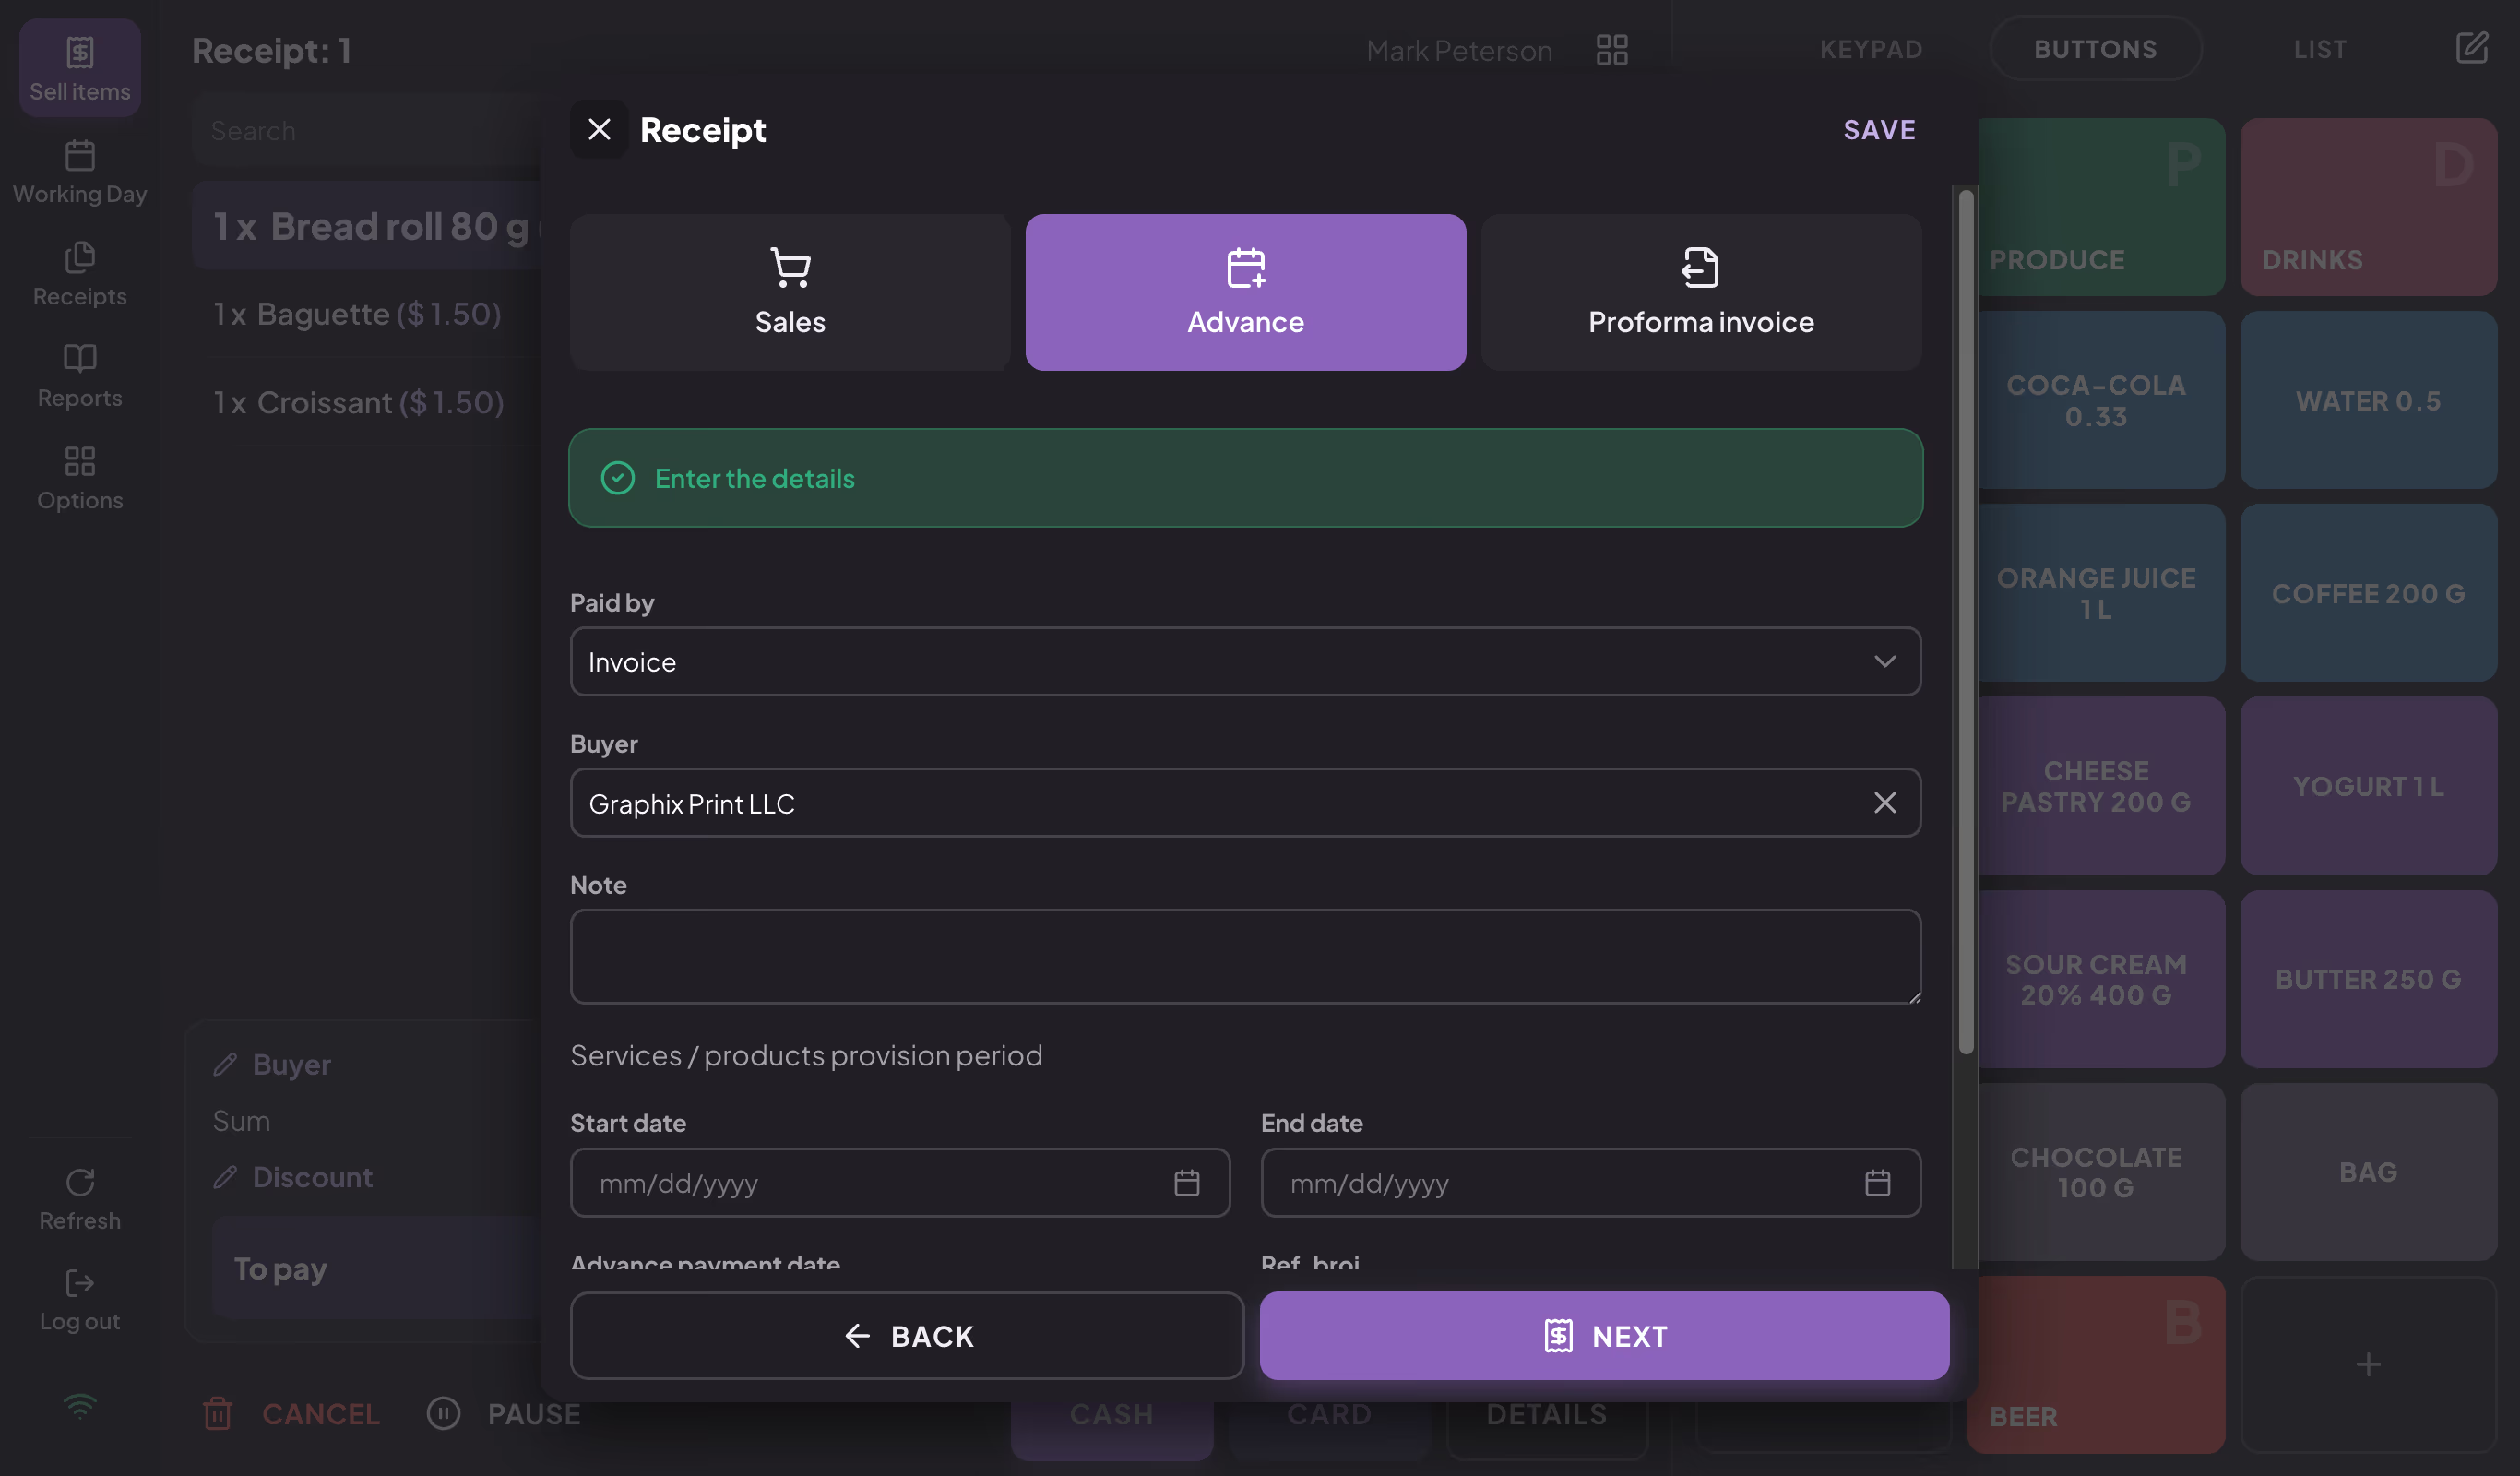
The Advance tab in the Receipt window
When the goods or service are delivered, you close the advance with a final receipt on the Receipts page.
Proforma invoice
A proforma invoice is an offer to the customer before payment. It is saved among your receipts as a proforma invoice and does not record a sale.
- In the Receipt window, choose Proforma invoice.
- Optionally, choose the buyer and enter the Proforma invoice number (for your records).
- Choose the payment method you expect.
- Click NEXT and ISSUE RECEIPT.
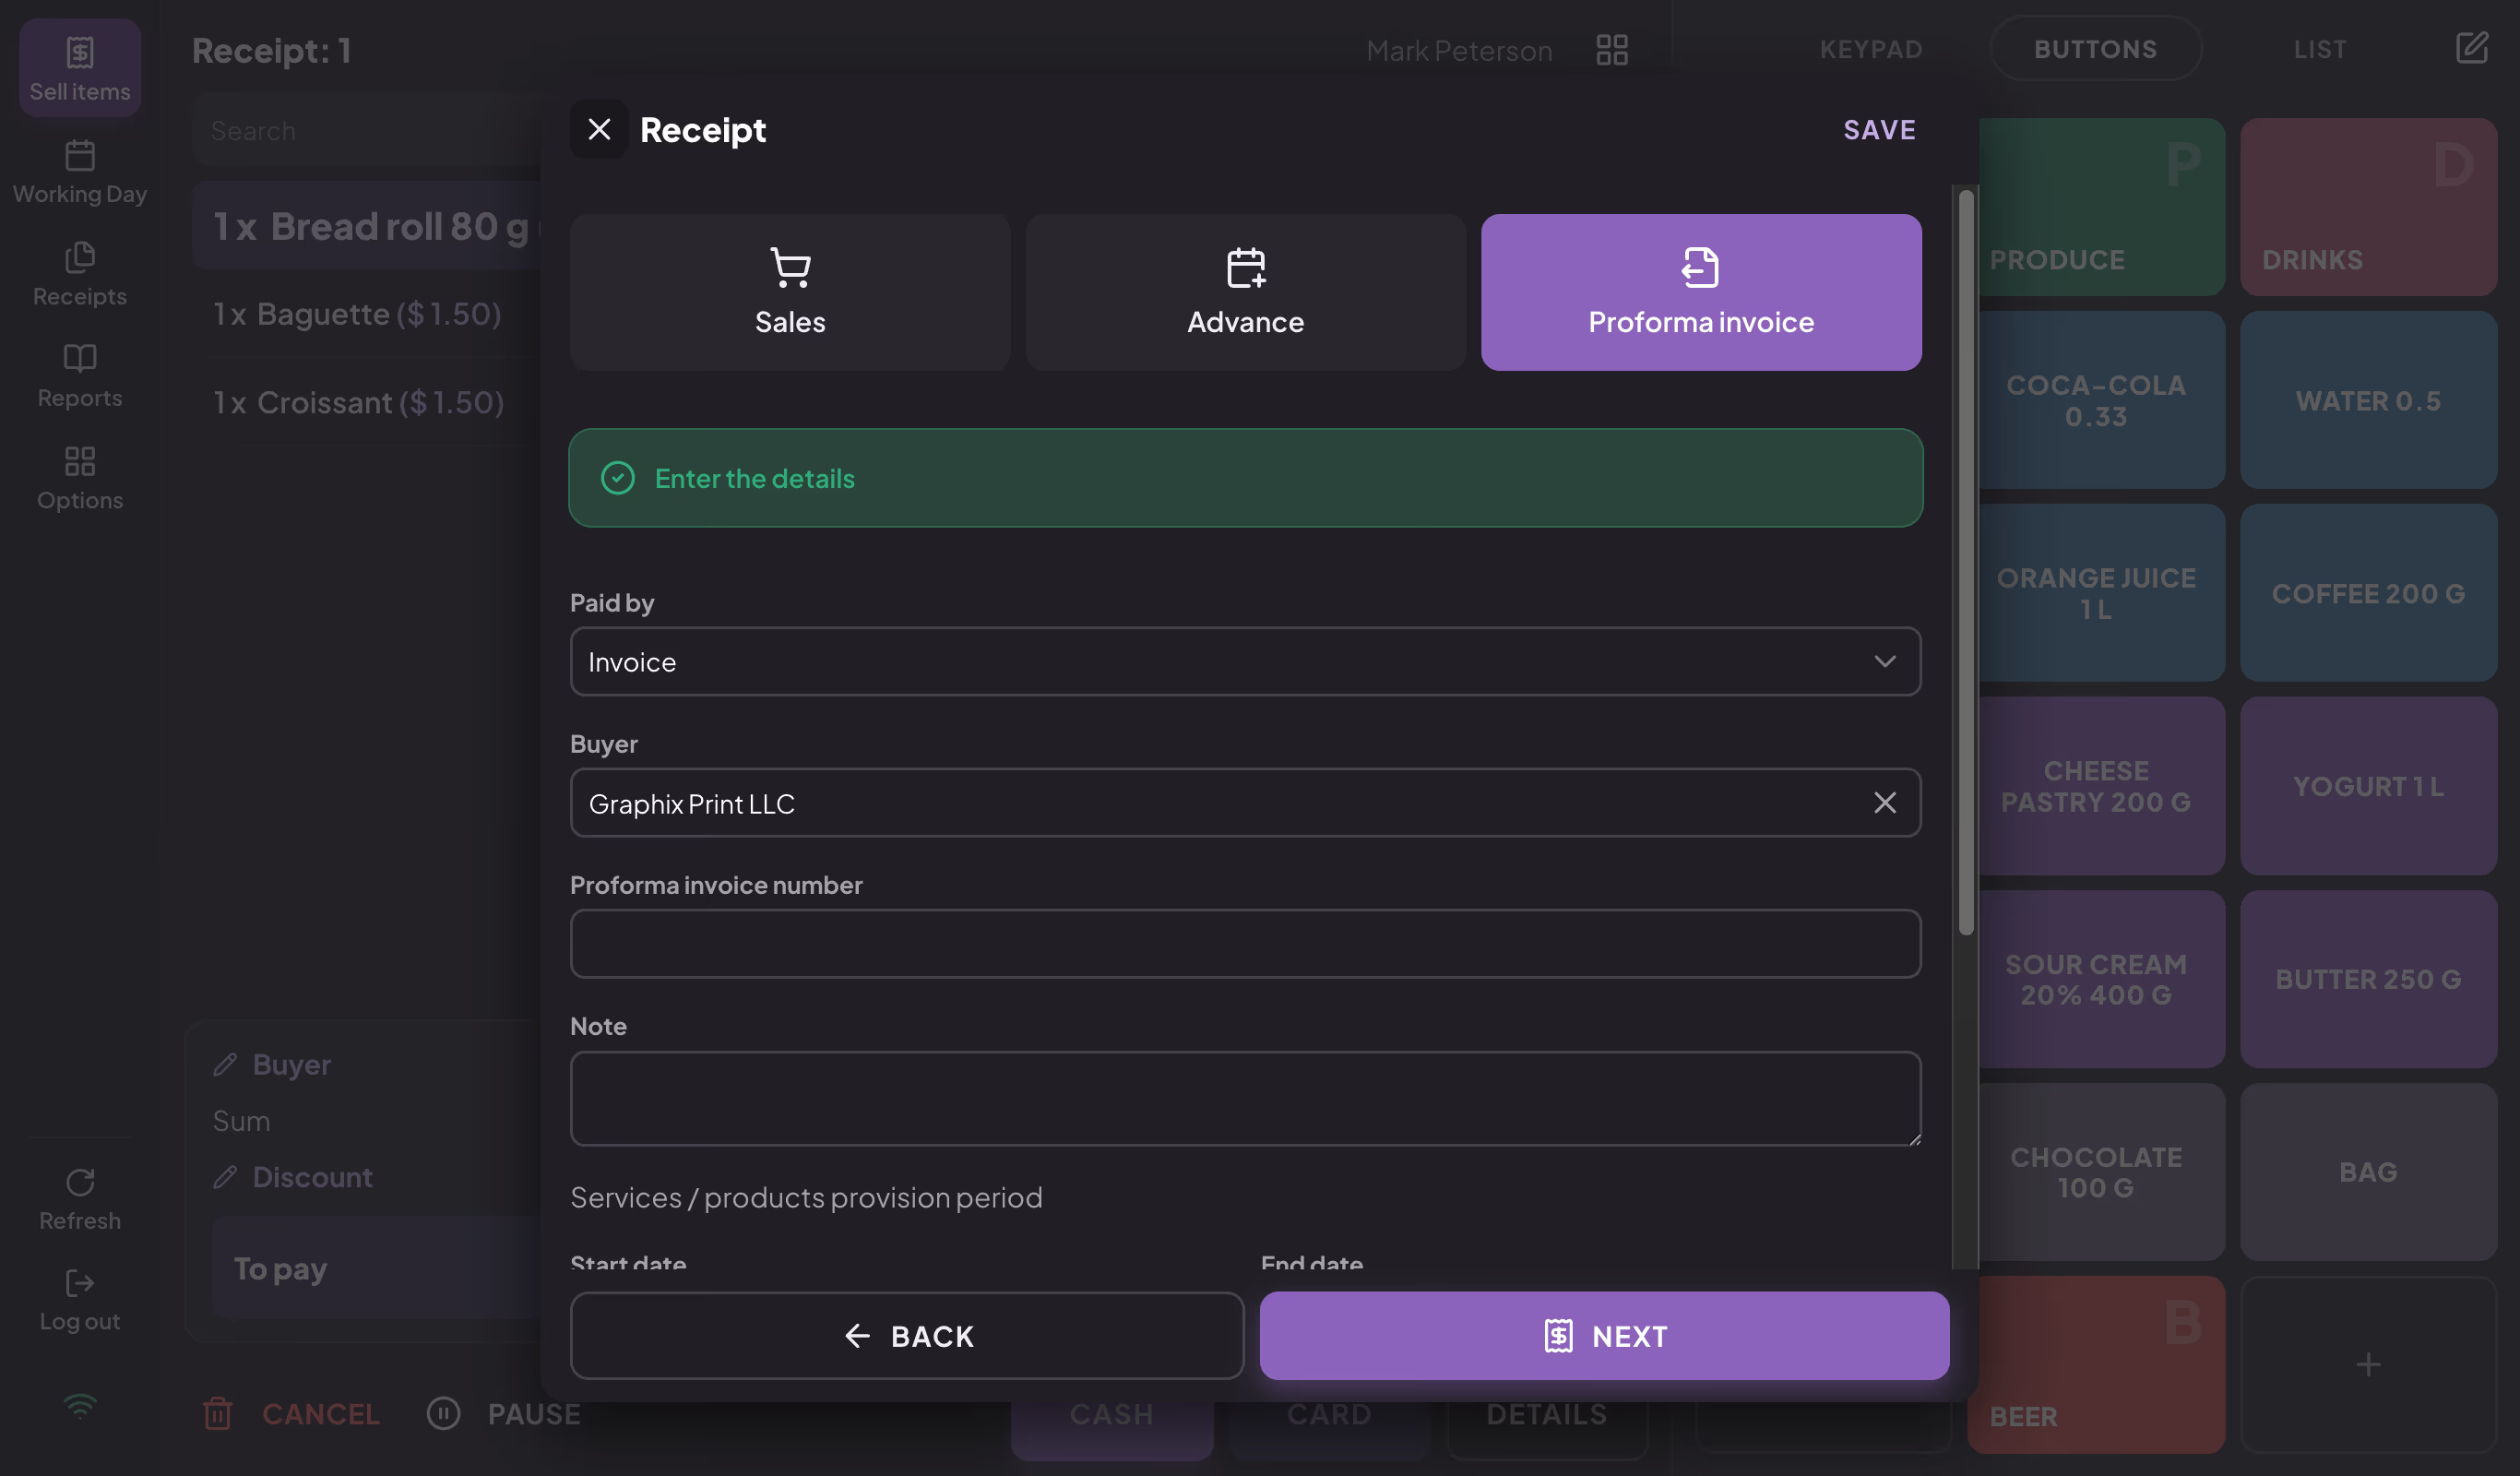
The Proforma invoice tab in the Receipt window
When the customer accepts the offer, you issue the receipt from the proforma invoice on the Receipts page.
Reference to an earlier receipt
The Ref. broj (reference number) and Ref. vreme (reference time) fields link the new receipt to an earlier receipt. Enter the earlier receipt's number and issue time as printed on it.
Enter a reference when the receipt contains a negative quantity (returned goods). When you cancel a receipt, issue a final receipt for an advance or a receipt from a proforma invoice, the app fills in the reference itself.
Period, due date and note
- Services / products provision period (Start date, End date) — for services that last for a period, for example a monthly subscription.
- Due date — the date by which the customer should pay the receipt.
- Note — text printed on the receipt. If an Invoice note is set in Administration (see My Account → Receipts), it fills this field automatically for the Invoice payment method and for a proforma invoice.
- Export goods / services (retail only) — tick it on a receipt paid by invoice or a proforma invoice for export.
Preview and issuing
After you click NEXT, the receipt preview opens. Check the items, the buyer and the payment method, then click ISSUE RECEIPT.
When a receipt printer is set up on the device (not in the web app), the ⋮ menu in the preview offers Print on receipt printer. When it is ticked, the receipt is printed on the receipt printer; when it is not (the default for an A4 document on a computer), the print window opens and you choose the printer. On Android devices, the option is always ticked.
What happens after issuing
When you issue a receipt:
- the receipt is saved with its number and issue time;
- the receipt is printed on the receipt printer (setup: Printers); in the web app, the browser's print window opens;
- the screen is cleared for the next customer (in hospitality, depending on the user group's After issuing order setting, you stay on the order screen, return to the table plan or return to the PIN screen).
All issued receipts are on the Receipts page. There you print a receipt again, cancel or correct it, and send it to the customer as a PDF.
When a receipt cannot be issued
When a receipt cannot be issued, the CASH and CARD buttons are unavailable, and the reason is shown in red at the top of the Receipt window.
| Message | What to do |
|---|---|
| "Buyer information missing." | Choose a buyer — it is required for an advance. |
| "Reference to the other receipt does not exist!" | Enter the earlier receipt's Ref. broj and Ref. vreme. |
| "Discount not possible. There are already unique discounts given on individual items." | Remove the individual discounts or give the discount per item. |
| "One or more items have a price of 0.00" | Enter a price for the item (Price option) or remove it. |
| "Choose payment type" | Choose the payment method in the Receipt window. |
| "Shift closed!" | Open the shift with the OPEN SHIFT button in the message (see Working Day). |